
Ultimate Guide To Hiking The Quilotoa Loop in Ecuador
Once we arrived in Ecuador, everyone we met immediately told us the Quilotoa trek was not to be missed! We’ve heard Quilotoa is a dormant volcano with a beautiful turquoise lagoon in the crater. We knew we wanted to visit, but we were not interested in doing a day visit to Quilotoa or pay for an expensive tour. We were told you can do a multiple day trek to Quilotoa on your own and visit a few villages along the way. This was exactly the type of experience we were looking for! So since we have done the work already, we want to share everything you need to know to complete the famous Quilotoa Loop on your own AND on a BUDGET! Yes you saw that right, it can be done on a BUDGET! So the following is what we figured out.

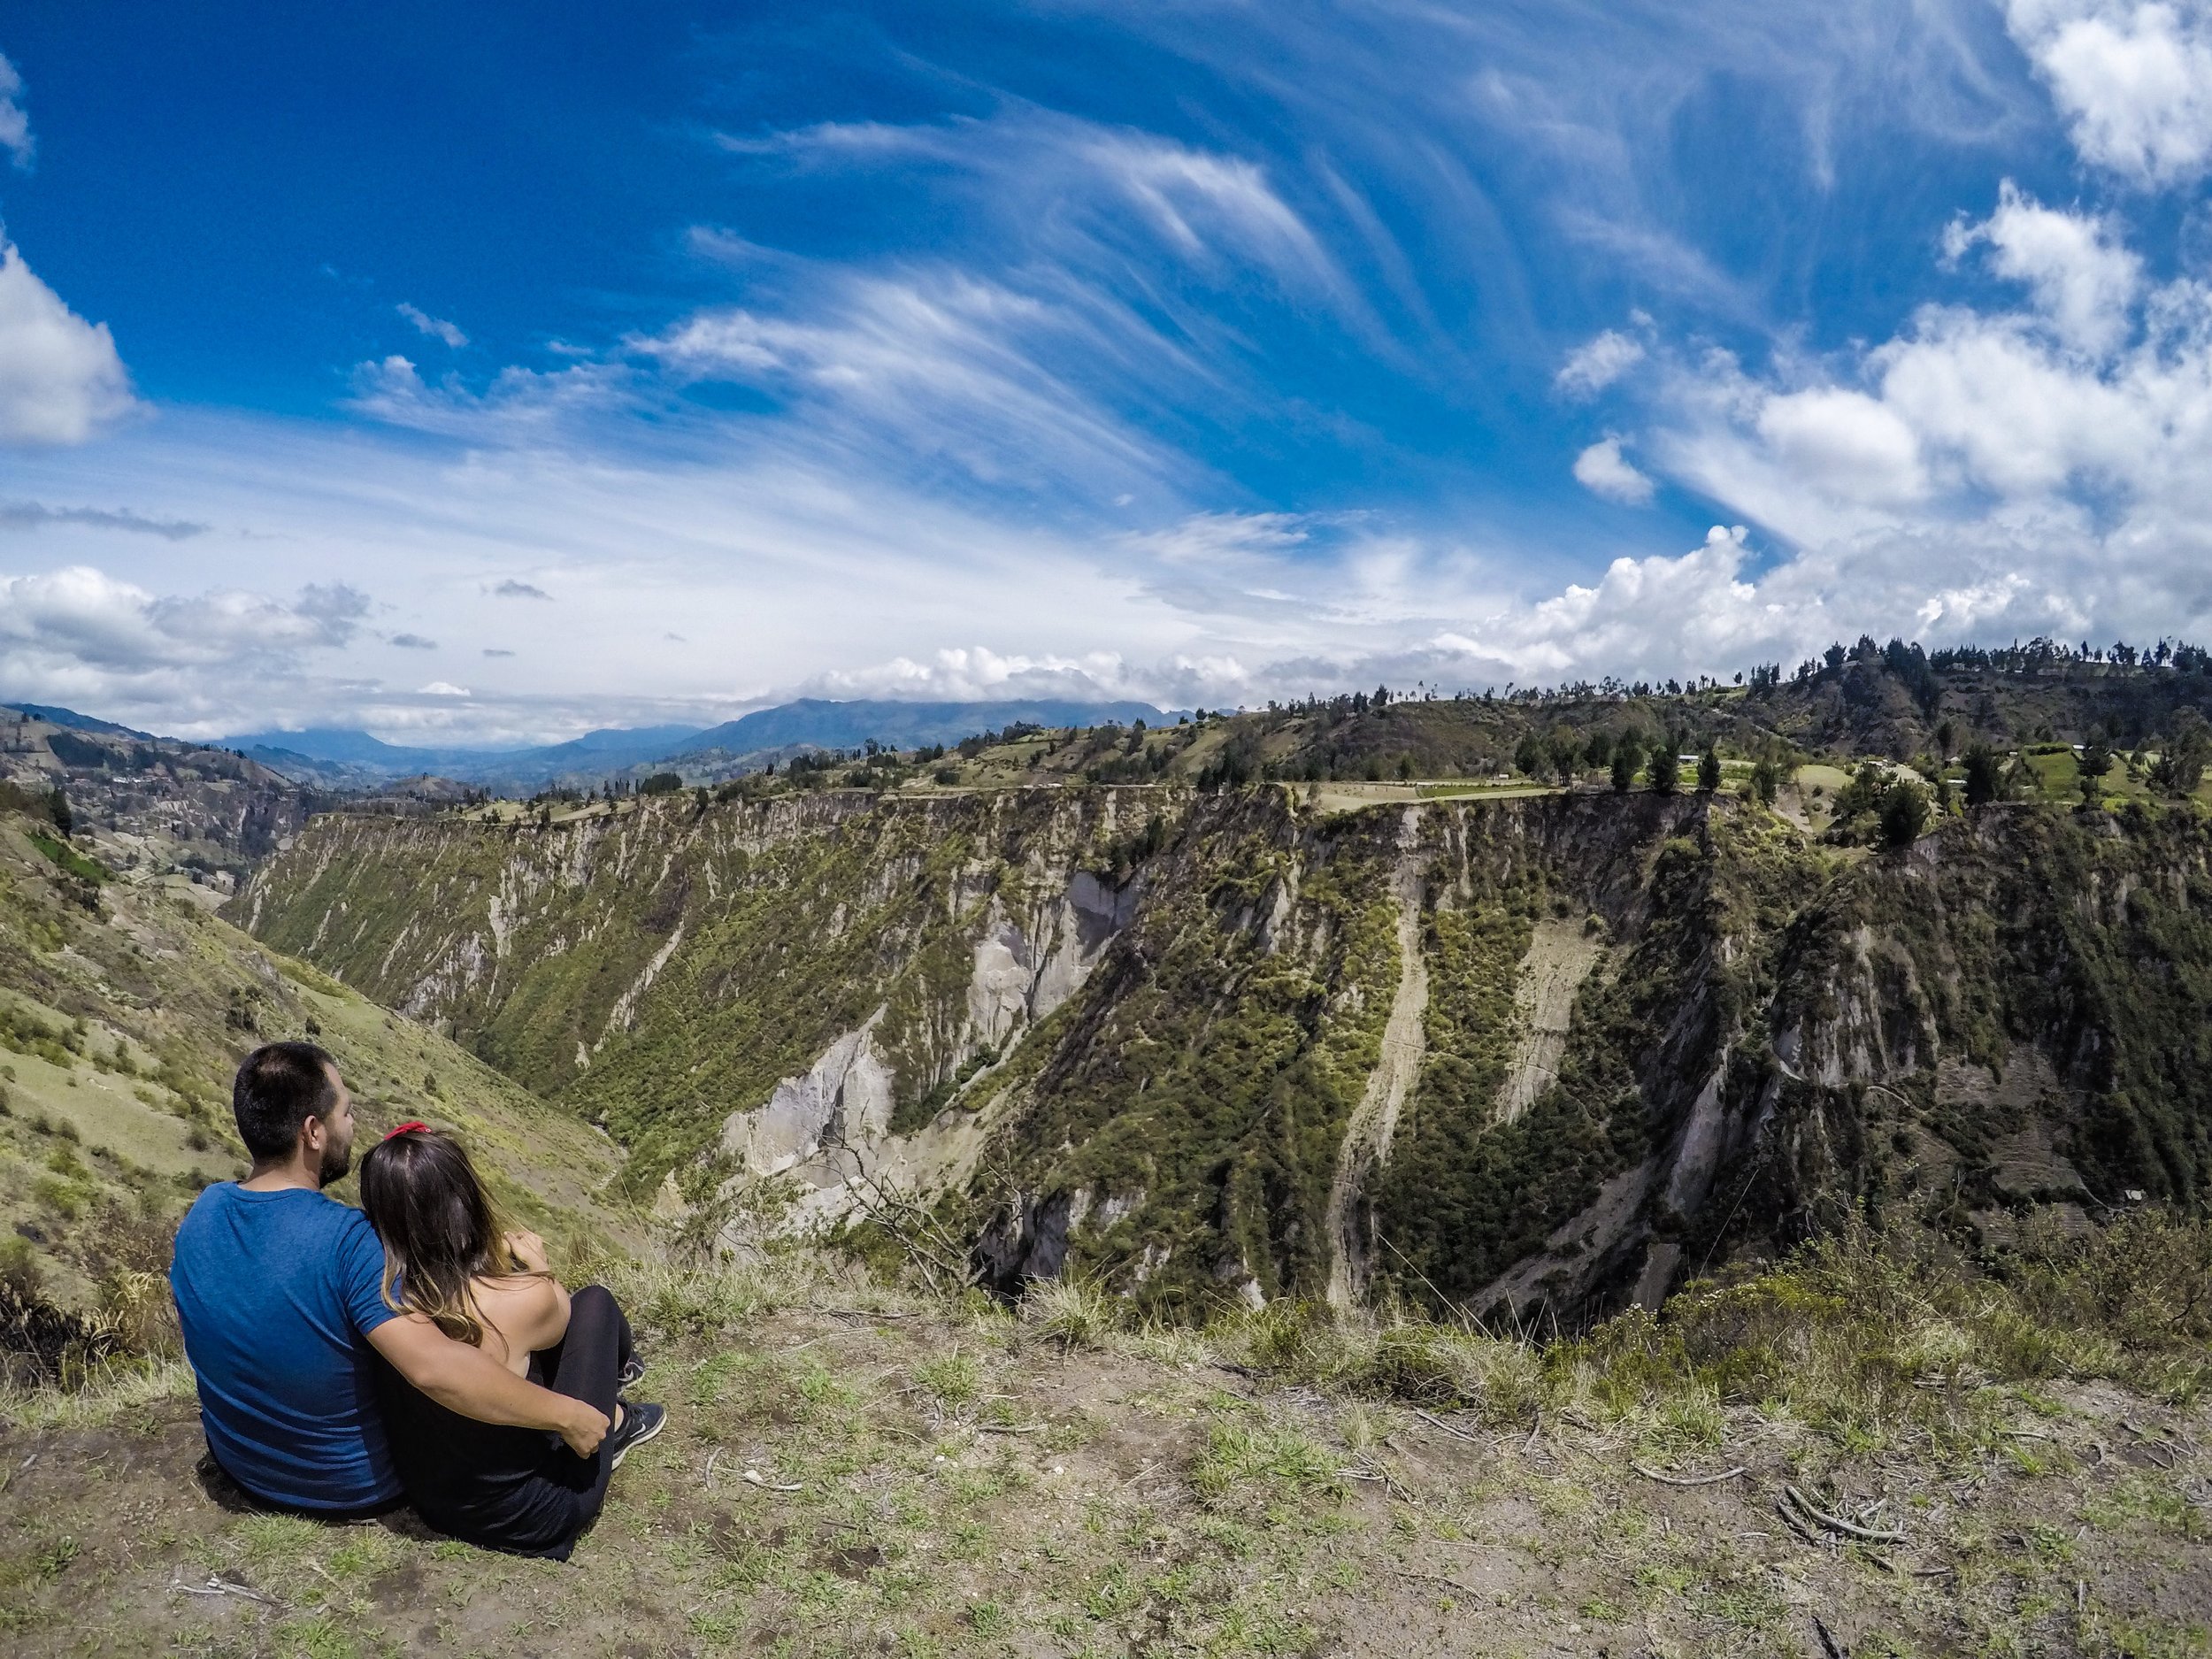
One of our highlights of Ecuador!
Where Do You Start: Latacunga
We decided to make our way to Latacunga from Baños the day before starting the Quilotoa trek. We left Baños at 2pm towards Quito with the bus company Baños Ejecutivo. We showed up at the Baños Bus Terminal about 15 minutes before leaving and had no issues buying a ticket. The bus ride was about 2 hours and very comfortable. We paid $2.50 per person and got dropped off by the main road “Carretera Panamericana” on a roundabout near Latacunga. Once we arrived, we got out close to this roundabout and plenty of taxis were waiting to take you to Latacunga center. As soon as we got off, it started to rain. The taxi wanted to charge us $5 to take us to the center. I said no and negotiated down to $4. I honestly didn’t want to push more since it was raining and we didn’t have another transportation option. The ride was not bad as it took about 10-15 minutes to arrive at our hotel. The 10-15 minute ride is through a smaller road passing a lot of local houses. It might look sketchy at first, but this is normal.
Tip: If you have the time, there are frequent local buses that pass by “Carretera Panamericana” (roundabout) and these are headed to the terminal in Latacunga. Always ask the bus driver if they are going to the Latacunga Terminal to ensure you will be taken to the right place. They charge $ 0.50 per person if you don’t want to take a taxi.
Accommodation in Latacunga: Hostal La Posada
We decided to stay at La Posada in Latacunga. Ohh boy... did we make the right decision! The hotel is located near many small restaurants, supermarket, bakeries and the mercado. The best part of our stay is definitely the level of customer service received from the owner Victor. Being a previous backpacker himself, he really understands what a traveler needs and makes sure he meets those standards. I had the opportunity to sit down and chit chat with him and I can honestly say he is a great person. He was able to connect with us and offer good advice on how to trek the Quilotoa Loop. He made great suggestions and recommendations for us to follow during our several day trek. This is what truly separates his accommodation from the rest. The rooms are very well priced…basic, but with hot water and even cable! It was a great stay before starting the trek around Quilotoa. But wait…there is more! Victor stores your luggage for FREE while you are away doing the trek. From reading online, other hotels charge a fee per day to store your bags. When you are ready to start your Quilota Loop adventures, stay in La Posada.
DAY 1: Latacunga to Sigchos
We left Latacunga the following day on the 8am bus to Sigchos. We walked over to the Latacunga bus terminal and jumped on the bus Reyna De Sigchos. They have several buses leaving early in the morning, but if you are planning to hike to Isinlivi the same day we recommend leaving at 8am. The bus cost was $2.30 per person and the drive was about 2 hours. We arrived to Sigchos and headed straight to the road towards Isinlivi. We asked a few stores and people on the street for directions to Isinlivi and they all pointed us the same way. Everyone is very kind and willing to help. If they see you with a backpack, sometimes they even point the way without you even asking.

On our way from Sigchos to Isinlivi.
Tip: Pickup a walking stick. There are many sticks laying around and will be helpful later in the hike. The stick will also help if you find yourself fighting off a dog along the way. (We were lucky to not see any mean dogs, but you can never be too sure.)
DAY 1: Sigchos to Isinlivi
We started our walk towards Isinlivi at 10am. The first two hours of the walk are very straight forward and easy. It is mostly downhill and you will not have many challenges. Be sure to keep following the signs to Isinlivi. The signs can be found on the most random places, but mostly on the rocks, walls and trees. These signs will consist of red, yellow, green or sometimes white spray paint. Pay attention because you can easily miss a sign.


Once we descended to a street, we saw a concrete bridge. We crossed the bridge and started to walk uphill. We kept following the street as Maps.Me showed us and shortly after we got stopped by a gentleman. He asked where we were going and we said Isinlivi. He told us the road we were on would come to an end and he pointed for us to go back a bit and start climbing uphill a dirt path, until we reach the main road. As soon as we started climbing, we started to see the signs on the trees and walls. This is were the most challenging part of the hike starts. You will be going on a steep uphill climb for a good 30-45 minutes. Keep following the path until you hit the main road.

After the tough 30-45min uphill climb, you get rewarded with views like these.
Once you arrive there, it is a good 45 minute walk to reach Isinlivi. The town is easy to spot from the top. We walked the rest of the way and arrived Islivi at 1:30pm. The walk will range from 3 to 4 hours depending on your speed and how many times you stop for breaks and to take pictures.
Duration of Walk Day 1: 3-4 hours
Difficulty of Trail: 3, the only challenging part for us was the 30-45 minute uphill climb to reach the main road towards Isinlivi.
Beauty of Trail: Average, the walk was pleasant and you get an introduction to the beauty of the green valley.
Accommodation in Isinlivi: Hostal Taita Cristobal
One of our main goals when visiting another country is to help the local economy. We try to do this by buying local! Making sure the hostels and places we stay at are locally owned. We were recommended Taita Cristobal due to its fair prices and comfortable accommodation. We will start by saying the rooms are spacious, really feel welcoming, and spotless clean! The room had a private bathroom and a nice hot shower. The views were breathtaking. We relaxed in our room after the hike and then moved over to the common area. This is when you really feel at home! The entrance to the common area has stunning views towards the valley. We took a couple of minutes just to take it all in. The hammocks facing the views were also a nice plus! Once you walk inside the common area, there are plenty of couches for you to sit down and relax. There are a few games you can play or books you can read. Miriam, the owner of the place will set up coffee and tea for you to enjoy. We met some new friends and had a great time just hanging out in the area. Once it started getting colder, they turned on the fire. It made the common area even cozier and helped keep us very warm and comfortable.
Time flew by, before we knew it they started setting up for dinner and started serving at 7pm. The best thing about Taita Cristobal is that they charge $15 per person, which includes dinner and breakfast. This is a very affordable price and great for what you get during your stay. The dinner was delicious and soon after we headed to our room to rest. The bed was sooo comfortable, Lorena had a big problem waking up in the morning! The room was great and with the covers provided, we didn’t get cold at night. We woke up, got ready and headed for breakfast which was served at 7:30am. Once again, the breakfast was delicious and a good amount. They let us refill our water bottles for FREE and we were ready to roll.
Before we left, we had the opportunity to talk to the owner, Miriam. We spoke for a few minutes and were super impressed with how much she cares for travelers. It was interesting to hear the story of how Taita Cristobal started, a couple of travelers walked into her store and asked if she sold dinner. At the moment she said no, but she told us she took the time to cook for these two lovely girls and the rest is history. Having a great place like Taita Cristobal is amazing, but doing it because you understand what most travelers seek is just plain heartwarming. Taita Cristobal is named after her father who she loved dearly. Being able to offer the type of services she does at a fair price just shows you how much Taita Cristobal cares about their customers. This hostel helps generate jobs for her, her family and some members of the Isinlivi community. For us this place was hands down one of the best places we have visited during our travels. If there is one thing we could change about our experience on the Quilotoa Loop, it would be to stay an additional night at Taita Cristobal. It is pure relaxa


DAY 2: Isinlivi to Chugchilan
Our second day started at 9am as we were making our way to Chugchilan. The trail started right outside Taita Cristobal. We followed the dirt road and after walking a few minutes we made a quick left and started going downhill. We then reached a bridge at the bottom of the trail and we started to go uphill. Once we got to a point, the route divided into two. One followed the main road to the left and the other went into the valley towards the right. We continued to follow the signs we found on our way and made a right.

Keep an eye out for those tricky hidden signs !
Tip: Make sure you keep your eyes open. Signs will be on the walls, floor, trees and anywhere they are able to mark the yellow/red marks.
The walk was very straight forward until we got to a 3-way street... ok no street, it was just a path. We were not able to locate the signs and we had to make a decision on what path to take. We started to bump into nothing but goats, at this point we figured out we had taken the wrong path and we were walking on the side of a very steep and very high mountain. We continued to follow this wrong path hoping we would get back on track. The path kept leading us even higher into this very steep mountain. Then…there was no more path! Ughhhh... we were lost in the mountains!

Luckily for us, a gentleman started throwing rocks from the top of the mountain to get our attention. He knew we were lost. We were possibly on private property at this point. Thank you Mr. Random guy! He keep signaling us to go straight down from the mountain... problem was, there was still no path to be seen! We got on our butts and started to slide down! We made it down and finally saw a path... not before some dirty pants, wet shoes and playing limbo to go underneath a barbed wired fence! Yea! We were back in business. We lost about an hour on our little adventure, but we were back on track.
TIP: Always keep Maps.Me on, but keep in mind it won’t always be right. After we got lost, we decided to continue following the signs and kept Maps.Me on as a backup.
As we continued walking the landscape kept getting even prettier. For the next few hours our path consisted of us staying along a river and walking until we found a way to cross to the other side. Finally, we arrived to what seemed to be the crossing point...a bridge made up of a huge tree trunk that ran from side to side. It was not bad crossing it, it was actually pretty cool. We passed a very cool suspension bridge to our left, which we didn’t cross. We kept walking straight as there was only one path towards Chugchilan.

We did not cross this suspension bridge, but it was great for a picture.
Tip: The routes have great signals thanks to Cloud Forest Hostal. They took the time to put up signs along the road for all travelers. You will see many red/yellow signs on the path.
This part of the hike is straight forward. You will pass a few villages and even a school. The kids will run to you asking for candy. We were told never to give kids money if they ask, but a candy or chocolate would be very well received. After passing the school and continuing to follow the path, you will eventually hit a steep part that leads up to the main road. This was the most challenging part of Day 2. It was about 20 minutes of a very steep uphill climb. Take your time as the road is nearby and it won’t be that hard. Once we reached the road it was a straight shot towards Chugchilan. We finally got to Cloud Forest at 1:30pm. It took us 4 hours and a half to get there, since we got lost for a good hour. The total time for this hike should be between 3 and 4 hours depending on your speed and how much you stop to rest and take pictures.
Duration of Walk Day 2: 3-4 hours
Difficulty of Trail: 3, the only challenging part for us was the 20 minute very steep uphill climb to reach the main road towards Chugchilan
Beauty of Trail: Very Pretty, the walk was pleasant and you get a variety of scenery including a pretty river.
Accommodation in Chugchilan: Hostal Cloud Forest
Another one of our favorites was definitely Cloud Forest. As soon as we walked into the room we were in heaven! The bed is super comfortable, but the pillows take the cake. They were just what we needed after getting lost wandering the green valleys of Ecuador. We were able to get a room with a private bathroom and nice hot shower for $15 per person. This price also included dinner and breakfast. Cloud Forest has a pretty cool social room. There was a ping pong table and a couple of pool tables. We all sat around the couches and kept warm with the fireplace. Soon it was dinner time. About dinner..... wow! The portion was big and delicious! We even got cake to finish up our night.
At the end of dinner, a nice gentleman that was working at the hostel handed out maps for the next days trek. He went from table to table taking the time to go over the map in detail and answer any questions. The map was extremely helpful and had very detailed instructions. We headed to rest and got the best sleep of this trek. In the morning, we headed down for breakfast at 8am. Once again, this was delicious and a perfect portion to prepare us for day 3. Before we left, we had the chance to meet and speak with Patricia the hostel owner. She asked us how we slept and if we enjoyed our stay... of course we did! This is another hostal that we felt takes good care of their customers. She was also very nice to give us some water and bananas for our hike. Hostal Cloud Forest is really more than a hostal... they treat everyone like family. They have taken the initiative to post up signs and make sure all travelers are safe during their hike around the Quilotoa Loop. They didn’t have to do this, but they wanted to do this to make sure all of us travelers got to their destination. Thank you Cloud Forest for going above and beyond and keeping all of us travelers going in the right direction.

DAY 3: Chugchilan to Quilotoa
This is it, the final stretch towards the town of Quilotoa. We were all set to go with our maps in hand. The first part of the trip is not bad at all and goes by very smooth. Make sure you follow the initial instructions to get on the dirt path and away from the main road. Just pay attention and stick to the road. The first decision you will have to make is simple... take the easy route or the extreme route. Extreme goes left toward Guayama San Pedro and easy goes right to La Moya. The night before the gentleman in Cloud Forest made us aware they had a recent landslide in the extreme route and highly recommend we all take the easier route. Based on his information, we decided to pursue the “easy” route towards La Moya. We started walking and soon hit a spot in which a path appeared. You can follow the road and reach La Moya or you can take the sendero which cuts through the valley for a shortcut. We decided to follow the sendero and crossed through part of the valley. We got to a point that it was all uphill, steep and narrow. This was the first challenging climb of the day. It took us about 15-20 minutes to get to the dirt road that led into La Moya. From here we kept walking straight on the road. You will pass through the Little Town of La Moya. Keep walking until you get to a point in which the dirt road continues straight or you can get on a path towards your left. Here you will also see a fence made up of sticks and trees. Stick to your left and follow along the fence. You will see many signs in this area and wooden sticks with the yellow/red paint signs. Once you are on the path, walk straight and go up the little hill. Once you start going down, you will face another decision. You can take path “A” downhill or go to your right and take path “B”. (Paths A & B will be detailed out with directions on the map you will be given at Cloud Forest.) We opted for path B as it seemed easier and the one with the best views.

We continued to follow path B along the edge of the valley. We got to a point in which you can see the waterfall Las Golondrinas and a beautiful view of valley. We decided to sit down and take a break since these were some of the best views we had seen!
After finishing our snacks we continued our path which lead us closer to the waterfalls. Continue the path as you will start going downhill. You will then have to cross a small stream to make it to other side. Once you cross, you will start to go uphill to another dirt road. This took about 15 minutes to get up. Once you get there, turn left and go towards the town of Guayama Grande. Keep walking past the town. The houses will always be towards your right. Keep Maps.Me on and eventually it will tell you at what point you should make a right. Continue walking straight on this path and eventually you will hit the uphill section. Keep following the road and you soon will see another sign by a path. You can follow the main road or go up the path as it is a shortcut. (Maps.Me will lead you towards the shortcut). Keep following the path for about 30 minutes until you hit the main road once again. As soon as you arrive to the road, make a right and keep walking. At some point in this road, you will start seeing the crater of Quilotoa. Follow the road all the way to the top! You will spot a few viewpoints during your walk. I highly recommend stopping by and admiring the view. It was really great! Once you are done with your break, keep following the road. Finally... the road comes to an end... Wow! You get your first sneak peek of the lagoon. At this point, you have two options: if you turn left it takes 3-4 hours to reach Quilotoa. If you turn right, it will take 1 hour and a half. Yes.. we turned right and headed towards Quilotoa. Remember: As you walk, always keep the lagoon to your left. We kept walking and finally reached Quilotoa! Time to head to our hostel and rest for the remainder of the day.
Duration of Walk Day 3: 5-6 hours
Difficulty of Trail: 4, this was the hardest day of the entire loop. There are a lot of uphills and downhills.
Beauty of Trail: Beautiful! The best part were the sweeping views of the valley below before getting to the Golondrinas Waterfalls.
Accommodation in Quilotoa: Pick Your Poison
I wish I could recommend a hostel here, but I really can’t. The town is full of hostels and you will not have any issues finding one. Unlike all the prior towns, this town had a different feeling. As soon as you walk into town, you will notice all the stores and everyone selling souvenirs. I completely understand that the Quilotoa Crater is located here, but this town simply felt money driven. It reminded us a lot of Aguascalientes in Machu Picchu. Everyone is out there to capitalize on the tourism. Which we completely understand, but just know that the feeling of authenticity will not be there. It’s a very different environment than Isinlivi or Chugchilan. I had a couple of experiences that allow me to make this statement. For one, we were staying at a place that charged us $15 per person for breakfast and dinner, but when another person came to ask for the price they told them $20 per person. I was in the room and was able to hear this. I was not to surprised since the town felt like a money making machine. My other experience came when going to a local store. I had purchased some snacks the day before and decided to return the next day. I got the same amount of snacks and the price was different! The lady just tried to charge me more for certain items. I was a little upset and made her aware that I came in yesterday and had paid less. She gave us a smirk and said ok, pay me the same amount as yesterday. This town is the final stop and the only place you can stick around for the final night if you wish to stay here to trek the crater the next morning or have an early departure the next day. Take it with a grain of salt, but this was our experience in this town.
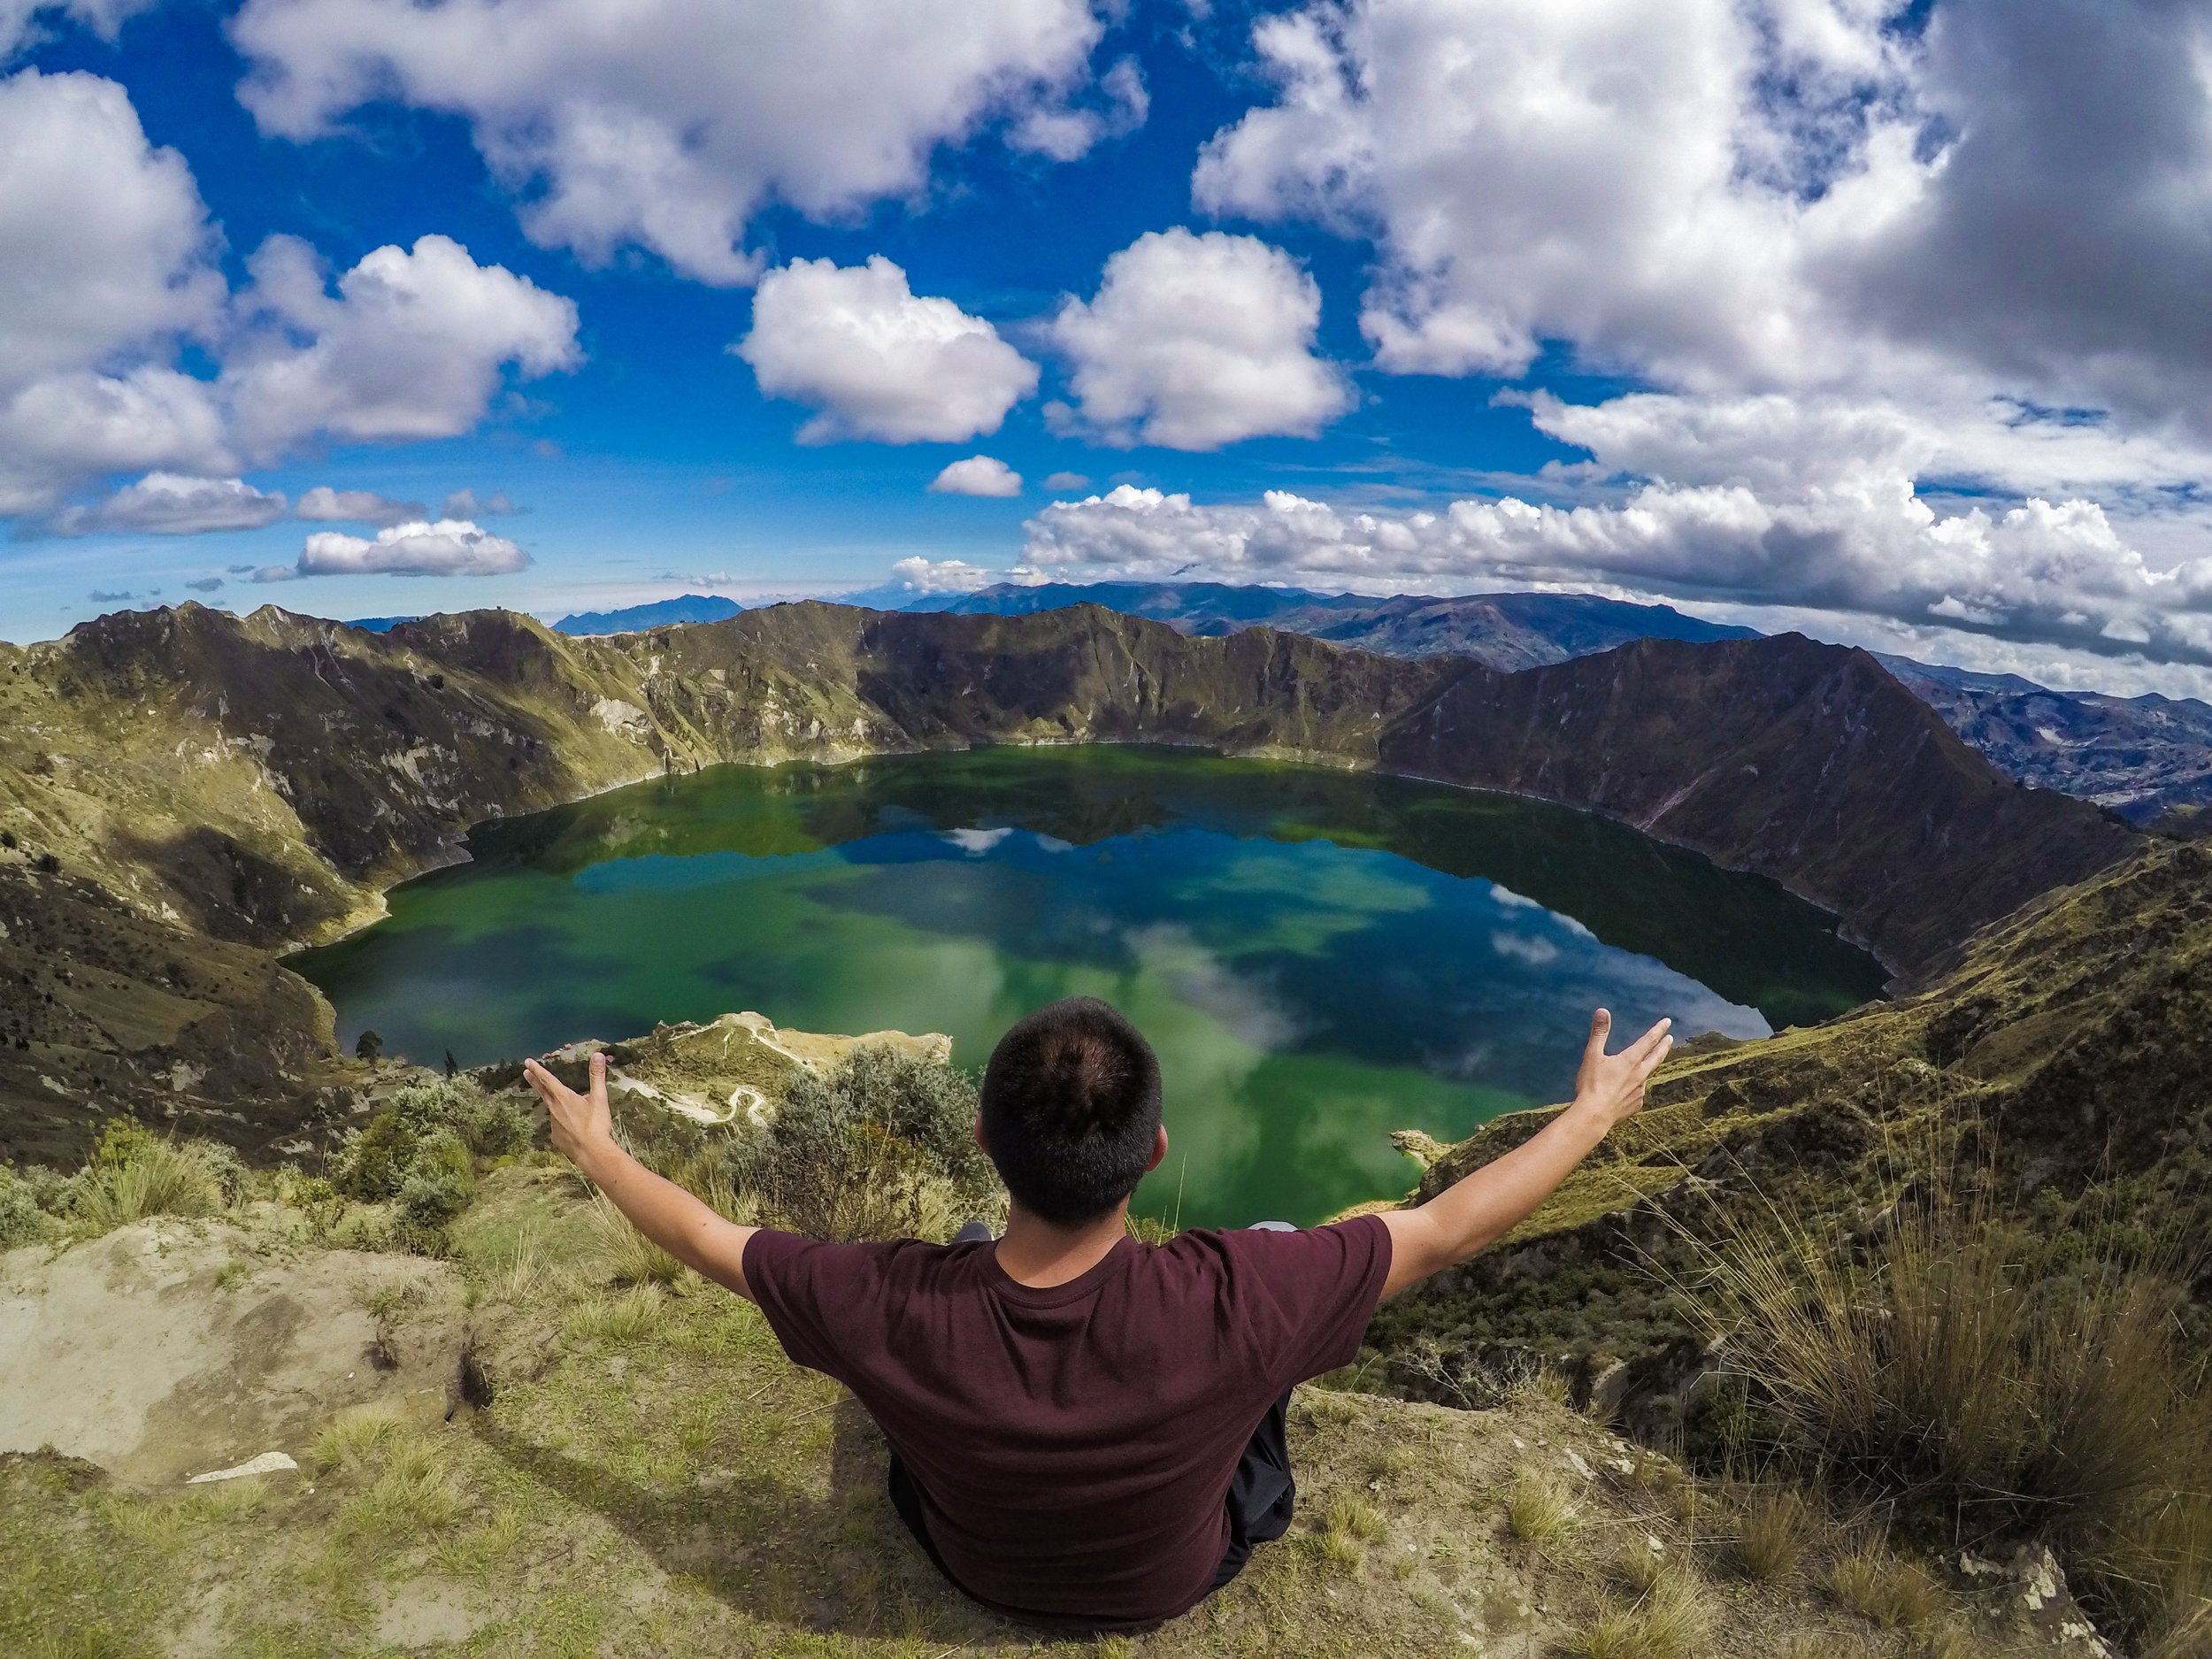
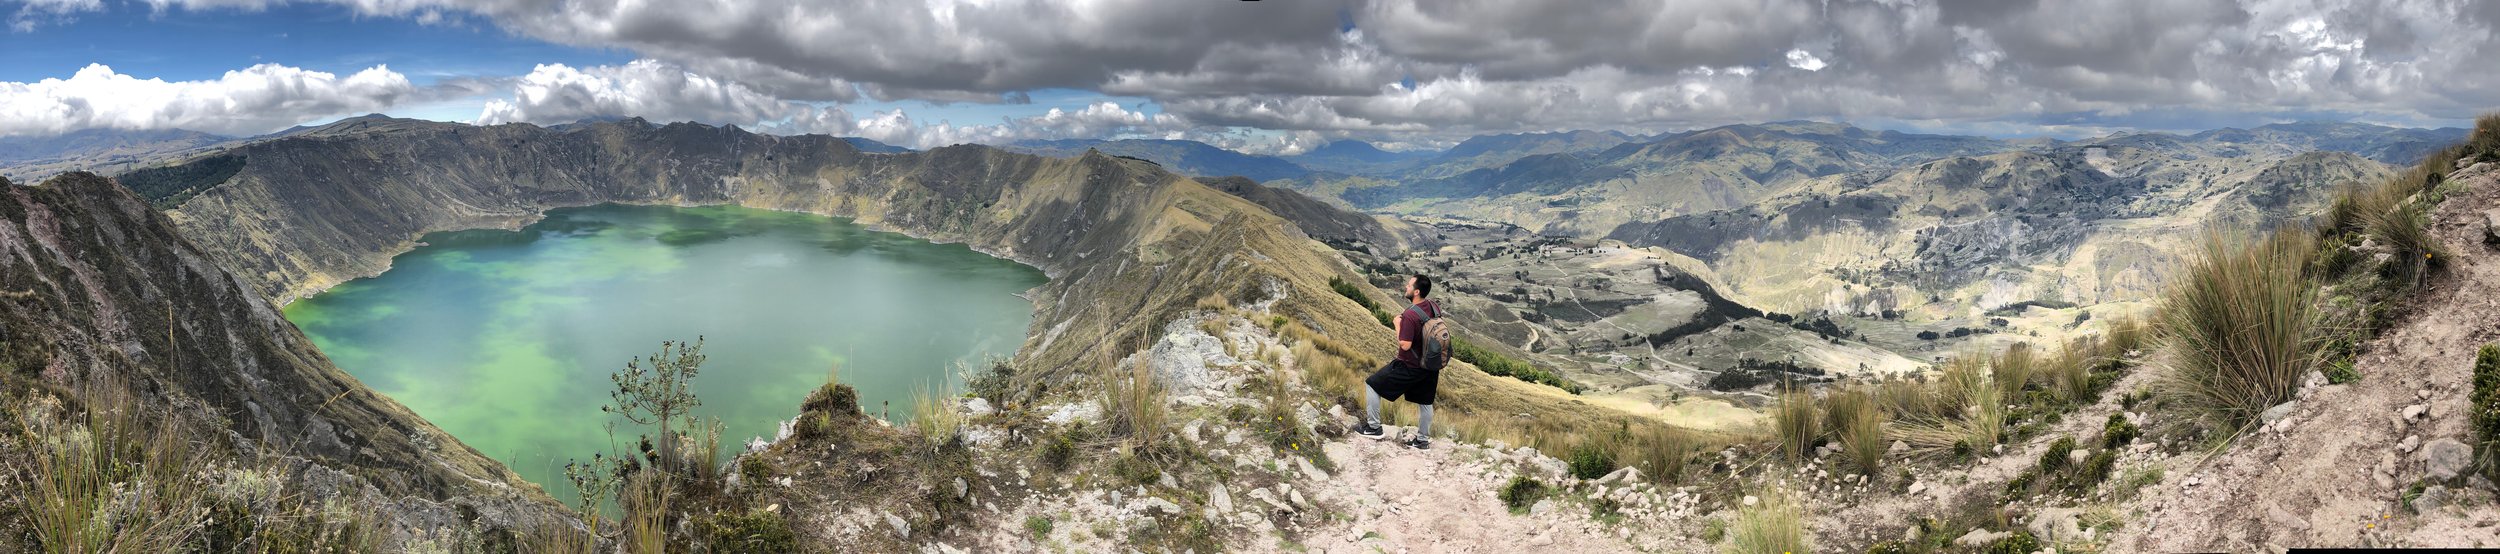
DAY 4: Trekking Around The Quilotoa Crater
The main reason why we decided to stay in Quilotoa was because we wanted to do the entire trek around the Quilotoa Crater. On Day 3 from Chugchilan, you will get some exposure to the Crater as you will walk 1.5 hours around it (if you take the short side). We woke up early, had our breakfast and we were off. We walked from our hostel and reached the crater…we looked left, we looked right… attempting to figure out which side was easier. Sorry to burst your bubble, but this is not an easy walk and not sure if any side is easier than the other one. We decided to head to the right side as we had walked into Quilotoa town via the left side. Two things helped make our decision: we had energy to start fresh and there was only one big uphill incline we would have to take going on the right side… so we thought!

The entire loop will vary in time from 5 to 6 hours. We took 5 hours and a half which included stopping to take breaks, pictures and just enjoy the freaking awesome views! Once we made it to the highest point in the Quilotoa Crater, we took out our snacks and enjoyed the spot alone for a good 15 minutes.

You will also find some viewpoints along the way. One of them charges…. I am not sure why you would pay $1 for a view which is FREE as you walk around. Trust me, I saved $1 and walked 2 minutes past the viewpoint and got a way better view and seat…you will thank us later! The walk is really breathtaking and something we would definitely recommend if you have the time.
Another option you have is to walk down to the lagoon. Once you are down there, you can rent a kayak for $2 per hour. We decided to spend our day walking around the crater and did not have energy left to go down by the lagoon. We also heard the climb up can be a challenge. If this is the case, you can rent a mule/donkey for the way up for $10.
Duration of Walk Day 4: 5-6 hours
Difficulty of Trail: 5! If you want a challenge walk around the crater, it consists of lots up uphill and downhill. It also can get very windy so be careful.
Beauty of Trail: Gorgeous! This lagoon will leave you speechless. You will be very lucky if you get a sunny day and are rewarded with the beautiful turquoise colors of the lagoon.
Getting Back to Latacunga
Once we were done with our hike, we were ready to head back to Latacunga. The best way is to grab a direct bus from Quilotoa to Latacunga (Terminal). We asked around and they guided us to walk to the main road and wait around for the bus. The bus runs from 10am to 4pm and leaves every 2 hours. The cost was $2 per person. If you miss the last bus, you will have to stay in Quilotoa or take a taxi/truck to the town of Zumbahua and then hop on another bus to Latacunga. This is also an option if you don’t want to wait for 2 hours or so for the direct bus to Latacunga. The taxi/truck to Zumbahua will cost $1 or $2 per person. Once you are in Zumbahua there are multiple buses towards Latacunga Terminal. They run every 20 to 30 minutes until 9pm.
Final Costs of Quilotoa Loop:
Our trek through Sigchos - Isinlivi - Chugchilan - Quilotoa-Quilotoa Crater was definitely a highlight of our Ecuador trip! We would highly recommend it if you have the time and are looking for some adventure. The best part is that it is a very affordable trek since you do it yourself. The following are the final costs for both of us:
Bus Latacunga to Sigchos: $4.60
Snacks bought at supermarket before the Quilota Trek: $8.60
Hostal Taita Cristobal (Dinner/Breakfast) Included: $30
Hostal Cloud Forest (Dinner/Breakfast) Included: $30
Quilotoa Hostal (Dinner/Breakfast) Included: $30
Snacks bought during entire Quilota Trek: $14.75
Bus Quilotoa to Latacunga: $4
Total Cost = $ 121.95 for both of us! This trek included transportation, food, snacks, water and a private room with bathroom in all of the hostels. This was the cost for our 3 night/4 day visit to Quilotoa.
Final Tips:
Bring enough cash to pay the hostels and for snacks. There are NO ATMs in the towns you will be passing.
Bring a refillable water bottle since you can refill your bottles at the hostels before heading out.
Bring light snacks (they feed you very well at the hostels). You can also buy additional snacks along the way. The prices are not that much higher.
Bring SPF and use it!
Bring sunglasses or a hat.
Bring warm layers you can take off during the hike if needed, but some parts might be cold.
Bring a raincoat if you are trekking during rainy season.
Don’t overpack clothes!
Bring basic toiletries; toothbrush, toothpaste, shampoo, soap etc.
Toilet paper!
Download MAPS.ME before leaving on your trek.
If Ecuador is in your radar, make sure to visit this incredible Quilotoa Crater! This self guided trek is easy.. yes you will get lost, but that is part of the fun! Keep a positive vibe and enjoy the multi day trek! Quilotoa is calling your name… pack up and head to this incredible region of Ecuador!
Has this been helpful? Pay it forward and book your stays via our Booking links!
Are you new to Booking? Click here and get $25 off your accommodation!
You won’t be charged more than what it would normally cost you. The small commission we make will help contribute towards the beer 🍻 & coffee ☕️ fund!
PIN ME FOR LATER
IF VISITING ECUADOR, YOU MIGHT ALSO LIKE:


